Pages

Wednesday, 15 July 2015

Tilly bag

Hi, welcome to the second tutorial I'm blogging over this week!  I said earlier that I'm useless at naming things - well, the name for this came into my head and I couldn't shake it!  I think the word 'utility' was going around my head and Tilly just developed from there!  This is a super cool bag - there are two zipped pockets, a pocket for my Kindle and removable straps.  I wanted to make a bag to bring to the Festival of Quilts, and this is it!  There are some great techniques for bag making here.

 Back zipped pocket:
 Pocket for Kindle:
 Hidden zip pocket behind Kindle pocket:
 Other interior pockets:
 And removable straps.  This way I can make and use a longer strap to be worn cross-body when I want.
Now, I'm going to tell you how to draft a pattern for this that suits you.  My Kindle isn't a standard size, so I think it's better to know how to make this in the size you want.  I'll be telling you how I made mine, but many of these steps can be changed - pockets etc.

Use an A4 page of paper (or two if needed).  If you are making this to fit a tablet, make sure you are leaving yourself enough room either side.  I drew around something for the corner, then drew a line up from there to the top.  Fold paper in half to cut off these parts to have a symmetrical template.

 If you are going to put a zip on the back (or indeed the lining later) work out your zip placement.  I chose 2" from the top.  Mark the usable length (8 1/2" here), ensuring it is in the centre, and mark two little triangles at each end.  Cut the triangles out.
 Cut out 2 of this shape from your bag fabric and 4 from lining (2 if not including this pocket).  Adhere a good interfacing to the back of the bag fabric.  I used Vilene H640 - a thick and spongy interfacing.  This is personal preference so change as to what you want.  I use this because it has some body but isn't too stiff.  Trim 1/4" from the top of one lining and the front section of the bag.  Set these aside until later - this zip will go into the back.

Position your template over the back of the fabric (so on interfacing) and mark out the little triangles, then use these to draw a long rectangle the length of the zip by 1/4".  Pin a lining fabric right sides facing to this, and sew all round the rectangle.  Tip: Don't just stop sewing when you get all the way around.  Continue at least an inch more so there are no weak spots.

Carefully snip down the middle of the stitching, and into the corners:
 Pull lining fabric through so wrong sides are facing and carefully press:
 Prepare the zip by sewing the end:
 Position zip underneath your opening.  You can pin it in place but I prefer to tack it.

Using a zipper foot and matching fabric, carefully stitch down.  Due to the thickness of the interfacing, I couldn't sew much closer than this, but that is perfectly fine.  I chose to sew around twice.
 Place another lining fabric behind this (so facing the lining fabric behind the zip - does that make sense?!) and using a narrow seam, sew all three fabrics together.

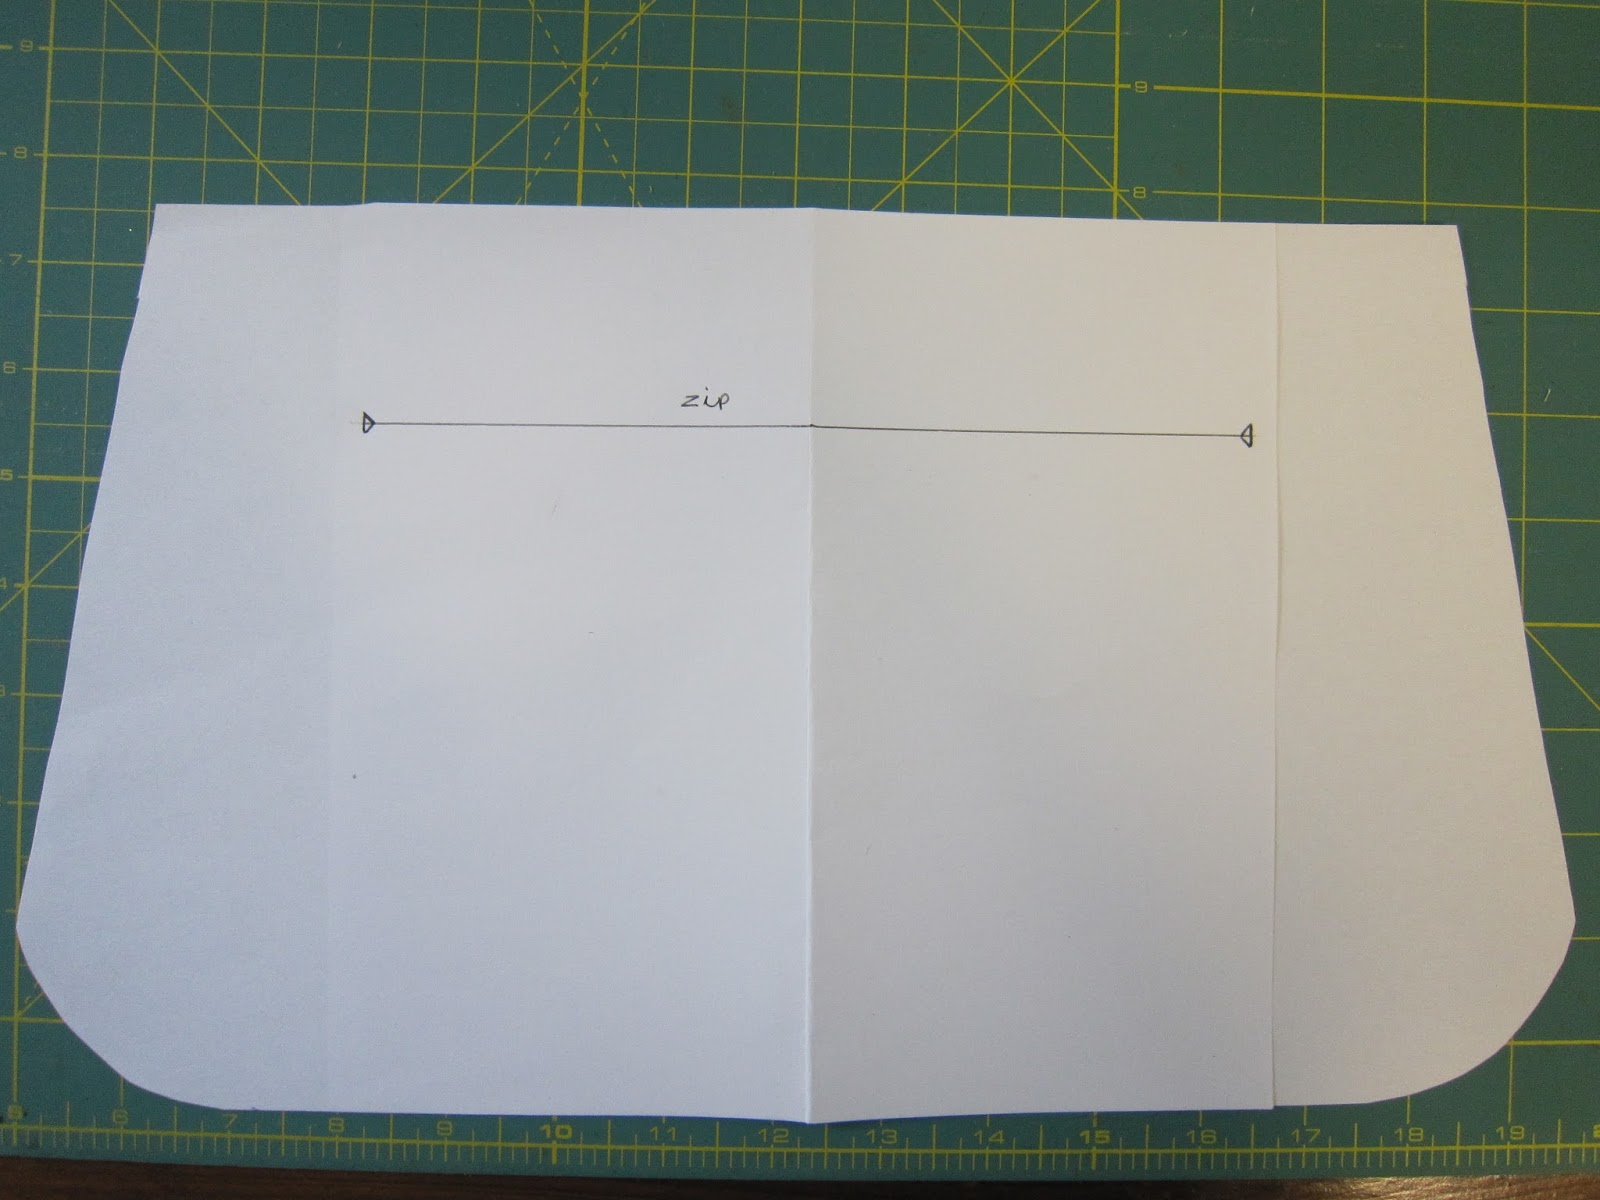
Prepare template for flap of bag.  I marked off what I chose for the width of the bag gusset (3 1/2"), then again folded in half and marked a suitable angle.  I then drew around something round (I think a 505 tin!) to round the edges.


 Cut one from bag fabric and one from lining, interface the bag fabric.

Measure approximately the outside of the bag.  It doesn't hurt if it's a bit longer!  Apply interfacing, then pin around the bag.  Sew using 1/4" seam.
 If your gusset is too long, at this stage cut off excess.  Here I measured what was excess - 1/2" - and cut across to make sure that the cut is even.
 Sew the front section to the other side of the gusset, then the bag flap to the back of the bag.

D Rings:
I chose to be able to remove and change my handles.  To do so, I'll attach them around a D ring.  You can always sew onto a D ring, or just sew your handle straight onto the bag.

For my D ring sections, I cut two pieces 1 1/2" x 3", folded in half, sewed around, leaving a hole to turn.  I turned out and stitched the closure shut.  Choose your position - remember the further down, the more it will pull out the sides of your bag.  Mark where you are going to sew it, and then another line 1 inch closer to the top.  Sew down the bottom of the D ring section
 put the D ring in place.  Position the top along the line marked previously and sew.

Lining:
Select the lining that you didn't trim down.  I chose to put a small zip pocket here.  I marked the fabric as above, then positioned a piece of fabric large enough to be folded to make the pocket.  Position this, then sew on zip as above.

 When you have inserted the zip, you can fold up the back and sew all the way around:
To prepare a pocket for Kindle or tablet:
Make a little tab.  I used a scrap of the outer bag fabric, but you could use the lining fabric.  I made my tab 4" x 1 1/2", then top stitched.  This will be trimmed down later.

 Cut two pieces from lining fabric at least as wide as your bag and the height of the tablet.  Sew together along top edge, then press and top stitch for neatness.  Position over the back of the bag, use a tiny stitch to tack to lining back, and then use the lining back to trim tablet pocket to match.

I chose to have this little tab close with a popper.  Follow instructions given with poppers.  Put a popper on the tab and on pocket.  Position tab between the top of the back section and flap lining and sew.  Trim excess of tab (if necessary).

If wanted, prepare slip pockets for the other main section.  These can be done by cutting two pieces 1/2" larger than required, sew around, turn out and stitch closed.  Top stitch down, dividing into sections if required.

(Here's where my camera was running out of battery and photos are more limited...)

Sew the bag lining together as for the outer bag, leaving a hole in the bottom.

Consider your closure.  If using a magnetic catch (or a sew-in magnetic catch as I have used), position and insert now.

Position lining and outer together, right sides facing, and pin carefully.  Sew all around flap and top edge of bag.  Clip curves on flap.

 Turn out through hole in lining.  Press carefully and topstitch around edge.  To control the gusset from pulling out, I nipped it in and used a backstitch on my machine to hold.

To control around the gusset, pinch the seam between back and gusset and topstitch around the bag.  Repeat for seam between gusset and front..  This can be seen in this photo:

Darn in all ends and sew up hole in lining with a ladder stitch.

I prepared a length for my handle - folded in half and then stitched closed.  I used poppers on both ends so it can be removed and replaced with a longer handle.  If you don't want this, you can stitch the handle in place instead.

Enjoy!  I'd love to know if you make this!

This also counts as one of this quarter's finishes!  Yay!

Tuesday, 14 July 2015

Stitch and flip tutorial

Hi,
I'm back with my first tutorial of this New Bloggers week!  Today, I'm going to show you something very simple - stitch and flip to make crazy shapes.  It's a great way to use tiny scraps.

Firstly, prepare you shape.  The easiest way to do this is by folding a sheet of paper in half and drawing half of your shape:


There we go, a perfectly symmetrical shape!  I advise using the crappiest, lightest paper you can find for this, and reduce your stitch length down - I went from 2.5 to 1.

 Place your first fabric in the centre.  I usually start with a motif of some kind.
 Position your next fabric on top, and sew 1/4" from the edge.
 Fingerpress open
 and continue around.  Note how I'm not necessarily using the initial shape, but cutting off different angles.  Here's how I worked out to the edge:


 Work out until you have covered your paper template.  Tear off the paper (that's the fun bit!)

There are a couple of little shreds of paper left, I wasn't too bothered about those.  Position right sides together with your backing fabric, inserting your ribbon (ric rac here)
This is how I prepped the points - trim across, and taper into the point.  For innies, snip in as close to the point as possible.  On curves, clip little 'v's.

Turn, press, and sew up. I use a ladder stitch, which is what I use to sew up anything like this, to sew binding on, EPP, even for applique when the edges are turned in.  It's the most common hand sewing stitch I use!

 Use matching thread where possible - here I'm using a contrast to show you.  Knot your thread, and bring it up, starting where the machine stitching is still holding.  This means that any difference between the machine sewing and hand sewing is minimised.
 Inset the needle on the other fabric directly opposite where you came out.  Make a short stitch under the fold.
Here's how little this stitch shows!  The trick is to keep the thread relatively taut, and, as above, as close to where your needle emerged as possible.  So much better than a whip or slip stitch!

Hopefully you can see how this little technique can be adapted to a variety of shapes!  I made a star and Christmas tree out of festive fabrics (my mum loves Christmas fabric, I have more scraps than I can possible ever use!).  I've made smaller hearts in the past, expressly to use the tinier scraps.  You can insert lace or ric rac, use decorative stitches on your machine or embroidery.  You can use this technique to make the shape, then use fusible interfacing to adhere and use as appliqué.

Monday, 13 July 2015

2015 New Bloggers Blog Hop - Hello!

Hello, and welcome to my little spot on this years blog hop for the New Bloggers!

My name is Eleanor, and this is my cat Perdie


Perdie just loves quilts.  And fabric.  And the ironing board.  And watching fabric be washed.  And wadding.  She loves it all, she's just terrible at posing for photographs (and yet, better than me).  She's called Perdie after Perdita in 101 Dalmations - she was a teeny tiny little thing when someone found her, lost, on the road and thought she must be ours.  She's now a whopper who is supposed to be on a diet...

I've been quilting for 6-7 years now.  I started it a little while after I finished university, and I credit it with keeping me sane through some hard times!  I was delighted to find a craft that was mine.  I have an incredibly crafty family!  My dad works with wood and metal, my mum knits and crochets, my sister makes jewellery, my aunt makes cards, my granny did everything - lace, knitting, you name it!  Most of my stash is from some shops in the area and isn't particularly modern, but I'm currently trying to work through it in order to build a more modern feeling.  I also have some WIPs that have been hanging around a long time, so I'm trying to get those finally finished too!  Truthfully, I'm fickle - I like working on lots of things, lots of types of things and lots of patterns of fabric!  It may not be fashionable, but I just like keeping a variety of things going.  I work with my mum - I do most of it, but we're still a team and most things have both of our work in them, even if it's just binding!

I'm very lucky to have a studio to work in!  We used to milk cows here at the house, but not any more - all our animals are now on a farm that we travel to every day.  I took advantage and converted an old byre (cowshed) into my very own slice of heaven!  From 5 cows to this:

It's not that tidy at the minute!  It is, in fact, a total mess!  But I've turned up some interesting things when tidying one corner, of which later!  Do you see the awesome table in the left there?  My dad made that for me.  It has five sides, no two of which have the same length, and five corners, no two of which are the same as the corner isn't a right angle!  I LOVE my table - I can fit a whole quilt on there to work on, and I have these cool cupboards from IKEA that I can use to extend the table for something huge/unco-operative.

Here are a few photos of things I've done that I particularly like:
 I made this for a class I was taking - it was supposed to be for beginners, but I took it hoping more classes would be made available afterwards which would lead to a degree in textiles.  The other classes didn't happen, but I love this quilt.  It started off as a standard Jacob's Ladder, then I rearranged parts before it was sewn together.  My only regret is that I didn't have enough fabric to make it a 4 x 4 setting.  You can't see it here, but I quilted each colour in a different pattern - lines on yellow, stippling on white, spirals on pink and a micro squared stipple on the green.  All the quilting was in white, so it just lead from one to the other.  When you see it in person, the back (all white) looks like a whole cloth of the patchwork pattern.
 I made this for Fiddlesticks Fabrics, a shop I've made quite a few samples for.  While I don't like the quilting (black and white variegated) as the thread does weird things, I still love the graphic impact of this.  I called this "Newspaper" - black and white and red all over.  I'm absolutely useless at naming things!
 This was the other item made for the class I mentioned above.  I'd had the idea of a clock for ages, but not a pattern, then it suddenly came to me that I could combine clock and colour wheel in one.  Unfortunately, while the clock is made, I haven't yet worked out a way to get it hanging - the clock mechanism is about 3/4" deep so it can't lie plumb to the wall (which is also what is making it look not flat here).  Soon though!  Weirdly, the wheel works better in person than it does in the photograph.  I drew the numbers myself, and this was the first time I'd tried satin stitch.
I was asked to make this baby quilt last year.  It was to be Irish themed, with appliqués of a cow, shamrock, teddy, doll...  I drew the appliques myself and used the Irish chain for the theming - inch and a half squares!  I've included this here because I was quite happy with my appliques - especially the teddy and doll!


I had had the idea in my head for a while of a bag split into two sections.  When asked to make a sample from these fabrics, I decided to try the idea.  The two flaps are for the two sections - lift the top flap and you're into one half of the bag, lift both to be in the other section.  I love making bags!

Which brings me to the end!  However, if you pop back here over the week, you'll find some free patterns and tutorials for things including a bag, pincushion, something for Christmas and something scrappy!  To top it all off, I discovered I have some duplicate magazines (Love Patchwork and Quilting) due to an error in postage - I was told to share them at the time, but they got put to one side.  So now, I intend doing a little giveaway later in the week!

A few tips:

Don't get discouraged at what you see on other blogs.  Some people work faster than you, that happens.  They may have a better range of fabric available for them to buy than you.  What you need to do is take pleasure in what you do and use other blogs as a jump off point for yourself.  Enjoy the process of what you are doing instead of rushing.  Love the fabrics you have, they deserve that!  If they don't work quite as you hoped, chalk it up to experience.  If you struggle with something - ask for help.  Bloggers are so helpful - the New Bloggers group have helped me with etiquette, picture editing, social media buttons* - and if you ask, someone will help.  The same thing goes for techniques

*My flickr page is very much a work in progress, started after issues getting pictures uploaded.  Nothing to see there yet!

So, if you're still here, I'd like to direct you towards the other brave souls who will be posting their introductions this week!

My hivemates in Sewcial Swarm:
Corinne at mustlovequilts
Vicki at orchidowlquilts
and Karen at sugarfreequilts
And huge thanks to our hive mama Terri Ann of childlikefascination

Quantum Quilters, hosted by Yvonne of quiltingjetgirl:
Silvia at astrangerview
and Cindy at stitchinathome

New Bees hosted by Cheryl of meadowmistdesigns:
Abby at hashtagquilt
and Megan at sewstitchingcutequilts

And lastly the Sew Fabulous Hive, hosted by Stephanie of latenightquilter:
Julie at pinkdoxies
Carrie at thezenquilter
Lori at sewpsychd
and Cindy at sewingmoxie.com


If you do comment, I'd love to know what you think is totally under rated or over rated in the world of quilting!  What (patterns, fabric etc) would you like to see more of, and conversely is there anything you could happily live without seeing again?! 

A couple of quick bits of trivia about me:
I have one long sighted eye and one short sighted eye;
I have two degrees from the University of St Andrews in Scotland, loved it!;
I lived in France for a year;
I love reading and read really quickly;
I broke my elbow and it is now exactly like Jem's in To Kill a Mockingbird (oh, to read To Set A Watchman or not!).

Thursday, 9 July 2015

A very quick finish


I bought this little memory box recently with the intention of doing something patchworky on the top.

 I cut 40 1" squares from my scrap jar and pieced them together, trying to pay no attention to placement of colours.  I put my little piece on wadding, quilted it in the ditch with invisible thread, and used 505 spray to adhere it to the little board.

 I use this box to hold these labels, which I use as thread catchers throughout the year.  I make hundreds of these for craft fairs around Christmas!
A really quick, cute and satisfying little finish!

Tuesday, 7 July 2015

ALYOF - July

I know, I know, it's not in the must do list, but I'm nominating a bag for the Festival of Quilts, mostly because I have an idea floating around my head!

Q3 Goals

Going for an ambitious list here!  Don't think I have any photos, so this is more a list for me to check back on.  Hopefully as I get through these, I'll be able to show more!

Must do
Baby quilt for M
Tractor from Farm Girl Vintage (one for Dad's birthday, then one for me)
Peacock wallhanging for Aunt M's birthday
Christmas ornaments that have been ordered

Should do
This is things for craft fairs:
Apple core table runner
Small nativity panel
Large nativity panel
At least 5 advent calendars
At least 5 stockings
Baby panel
QAYG sampler quilt

Want to do
Sal's quilt
Pink Karma quilt
Blue Karma quilt
Bag for Festival of Quilts
Christmas cushion
"Press" wallhanging
Dog quilt

12 1/2" FGV block for wallhanging
Music player mat
Mini Christmas cushions x 2
Pat Archibald junk
Pat Archibald elephant
Jennie Rayment cushion
Softies: Dachshund, cow, elephant

Not strictly finishes
Finish quilting L's quilt
Put together jelly roll flimsy

Wednesday, 1 July 2015

Last finish for Q2

The first of the cut/press/sew/quilt wallhangings by Lori Holt.  I backed it in a super thick calico.  When I was quilting it it sounded like quilting through cardboard, but it has the neatest corners I've ever seen and it's hanging really well.  Just noticed I don't have a button sewn in the middle, whoops!

Pretty chuffed with this quarter's worth of finishes!