Hi, welcome to the second tutorial I'm blogging over this week! I said earlier that I'm useless at naming things - well, the name for this came into my head and I couldn't shake it! I think the word 'utility' was going around my head and Tilly just developed from there! This is a super cool bag - there are two zipped pockets, a pocket for my Kindle and removable straps. I wanted to make a bag to bring to the Festival of Quilts, and this is it! There are some great techniques for bag making here.
Back zipped pocket:
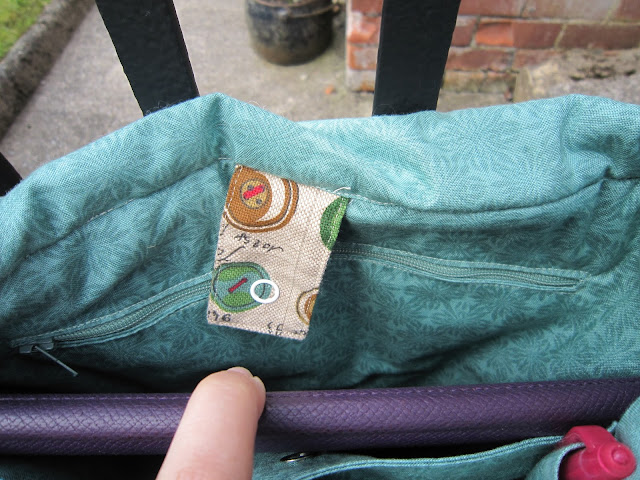
Pocket for Kindle:
Hidden zip pocket behind Kindle pocket:
Other interior pockets:
And removable straps. This way I can make and use a longer strap to be worn cross-body when I want.
Now, I'm going to tell you how to draft a pattern for this that suits you. My Kindle isn't a standard size, so I think it's better to know how to make this in the size you want. I'll be telling you how I made mine, but many of these steps can be changed - pockets etc.
Use an A4 page of paper (or two if needed). If you are making this to fit a tablet, make sure you are leaving yourself enough room either side. I drew around something for the corner, then drew a line up from there to the top. Fold paper in half to cut off these parts to have a symmetrical template.
If you are going to put a zip on the back (or indeed the lining later) work out your zip placement. I chose 2" from the top. Mark the usable length (8 1/2" here), ensuring it is in the centre, and mark two little triangles at each end. Cut the triangles out.
Cut out 2 of this shape from your bag fabric and 4 from lining (2 if not including this pocket). Adhere a good interfacing to the back of the bag fabric. I used Vilene H640 - a thick and spongy interfacing. This is personal preference so change as to what you want. I use this because it has some body but isn't too stiff. Trim 1/4" from the top of one lining and the front section of the bag. Set these aside until later - this zip will go into the back.
Position your template over the back of the fabric (so on interfacing) and mark out the little triangles, then use these to draw a long rectangle the length of the zip by 1/4". Pin a lining fabric right sides facing to this, and sew all round the rectangle. Tip: Don't just stop sewing when you get all the way around. Continue at least an inch more so there are no weak spots.
Carefully snip down the middle of the stitching, and into the corners:
Pull lining fabric through so wrong sides are facing and carefully press:
Prepare the zip by sewing the end:
Position zip underneath your opening. You can pin it in place but I prefer to tack it.
Place another lining fabric behind this (so facing the lining fabric behind the zip - does that make sense?!) and using a narrow seam, sew all three fabrics together.
Prepare template for flap of bag. I marked off what I chose for the width of the bag gusset (3 1/2"), then again folded in half and marked a suitable angle. I then drew around something round (I think a 505 tin!) to round the edges.
Cut one from bag fabric and one from lining, interface the bag fabric.
Measure approximately the outside of the bag. It doesn't hurt if it's a bit longer! Apply interfacing, then pin around the bag. Sew using 1/4" seam.
If your gusset is too long, at this stage cut off excess. Here I measured what was excess - 1/2" - and cut across to make sure that the cut is even.
Sew the front section to the other side of the gusset, then the bag flap to the back of the bag.
D Rings:
I chose to be able to remove and change my handles. To do so, I'll attach them around a D ring. You can always sew onto a D ring, or just sew your handle straight onto the bag.
For my D ring sections, I cut two pieces 1 1/2" x 3", folded in half, sewed around, leaving a hole to turn. I turned out and stitched the closure shut. Choose your position - remember the further down, the more it will pull out the sides of your bag. Mark where you are going to sew it, and then another line 1 inch closer to the top. Sew down the bottom of the D ring section
put the D ring in place. Position the top along the line marked previously and sew.
Lining:
Select the lining that you didn't trim down. I chose to put a small zip pocket here. I marked the fabric as above, then positioned a piece of fabric large enough to be folded to make the pocket. Position this, then sew on zip as above.
When you have inserted the zip, you can fold up the back and sew all the way around:
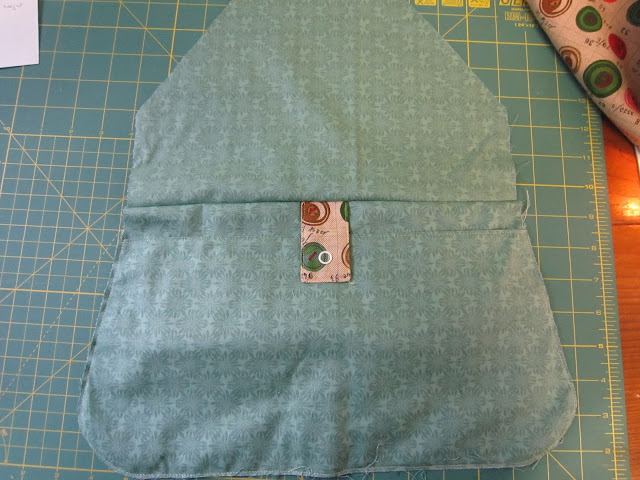
To prepare a pocket for Kindle or tablet:
Make a little tab. I used a scrap of the outer bag fabric, but you could use the lining fabric. I made my tab 4" x 1 1/2", then top stitched. This will be trimmed down later.
Cut two pieces from lining fabric at least as wide as your bag and the height of the tablet. Sew together along top edge, then press and top stitch for neatness. Position over the back of the bag, use a tiny stitch to tack to lining back, and then use the lining back to trim tablet pocket to match.
I chose to have this little tab close with a popper. Follow instructions given with poppers. Put a popper on the tab and on pocket. Position tab between the top of the back section and flap lining and sew. Trim excess of tab (if necessary).
If wanted, prepare slip pockets for the other main section. These can be done by cutting two pieces 1/2" larger than required, sew around, turn out and stitch closed. Top stitch down, dividing into sections if required.
(Here's where my camera was running out of battery and photos are more limited...)
Sew the bag lining together as for the outer bag, leaving a hole in the bottom.
Consider your closure. If using a magnetic catch (or a sew-in magnetic catch as I have used), position and insert now.
Position lining and outer together, right sides facing, and pin carefully. Sew all around flap and top edge of bag. Clip curves on flap.
Turn out through hole in lining. Press carefully and topstitch around edge. To control the gusset from pulling out, I nipped it in and used a backstitch on my machine to hold.
To control around the gusset, pinch the seam between back and gusset and topstitch around the bag. Repeat for seam between gusset and front.. This can be seen in this photo:

Darn in all ends and sew up hole in lining with a ladder stitch.
I prepared a length for my handle - folded in half and then stitched closed. I used poppers on both ends so it can be removed and replaced with a longer handle. If you don't want this, you can stitch the handle in place instead.
Enjoy! I'd love to know if you make this!
This also counts as one of this quarter's finishes! Yay!


A good tutorial Eleanor and some useful tips . I think I'll print this off
ReplyDeleteGreat tutorial! Love the fabric you chose too, and great idea to have removable straps so you have options! The bag reminds me of the satchels my mum bought my sister and me when we were in England in 1972. That's dating me...
ReplyDelete